10 steps to start with Atomic Scope
A lot of different “how to” scenarios are already explained on the
Atomic Scope website. But I was missing a real starters guide, how someone who is completely new to Atomic Scope, can have a quick start. Hopefully, after some guidelines in this post, it will be a good starting point, where you can build all your future business processes on. From this point, I assume you already know the purpose of Atomic Scope. If not, you might first read
Saravana’s post. I also assume you already have installed your Atomic Scope instance. If you haven’t,
here is how to do that.
User security in Atomic Scope is built on Windows Active Directory accounts and the user installing Atomic Scope will also be the first super user; he/she can add more users and groups and give them the appropriate access rights.
Atomic Scope terminology
Before we can start, I need to explain some terminology and the first basic choices you need to make that will impact on how you will use the product and on the license cost.
On the
pricing website you will see that a basic production license will include the following:
• Unlimited resources under workspaces
• Unlimited workspaces
• Unlimited users
• Unlimited Technical support and software upgrades and updates
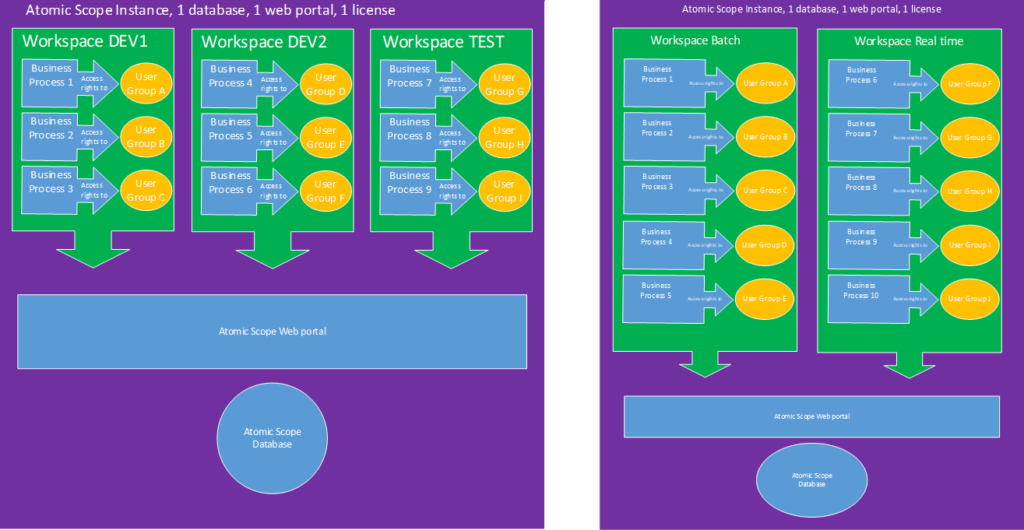
But what does this mean? The 2 last options speak for themselves, but how do you need to understand “workspace” and “resource”? You can define a workspace as an “environment” both in the idea of DEV / TEST / PROD environments as maybe a “batch processing” and a “real time processing” environment.
A resource on the other hand is something that will throw events to this environment. A resource can be:
• an on-premises BizTalk environment
• an Azure resource group containing your logic apps
• an API Resource
• a Microsoft Flow environment
You need to associate a Resource to a Workspace, but you will not be able to share resources across different workspaces. On the workspace level, you can then create Business Processes. This business process is the level where you will provide access to your business users. The only limitation you will have on the product, on a licensing perspective, is the number of business processes across all your workspaces. So, you really need to think about how you will divide, and give names to, your business processes. On a standard license, you will have 10 business processes to start with, but you always can extend this limitation by purchasing additional licenses.
Some real scenarios on how you would be able to organize your business processes amongst multiple workspaces are as follows.
1. Install the product
For a full installation manual please have a look
here.
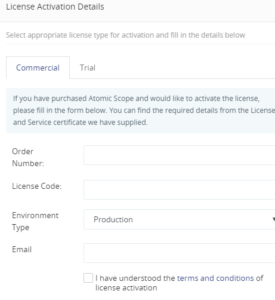
2. Activate the license
After the installation, you firstly need to activate your license. To do so, go to Settings -> License -> Activate, fill in all license parameters you have received, Trial or Commercial license and click on Activate. This procedure needs an active internet connection from the server where Atomic Scope becomes installed. If you do not have this, you can activate manually with some support of the Sales department of the Atomic Scope product team.
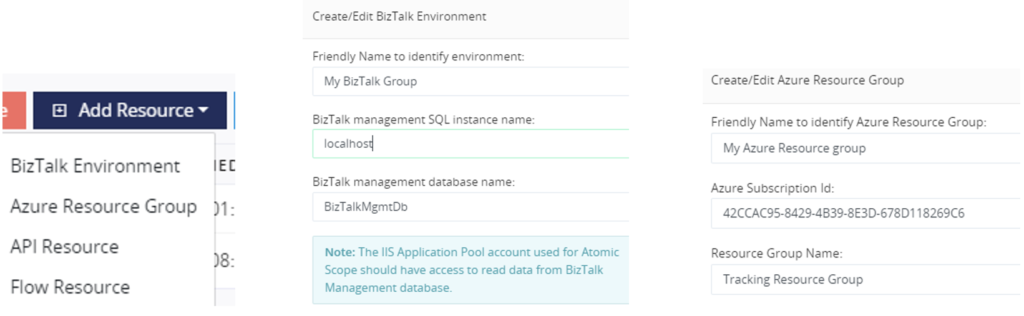
3. Define resources
Secondly, you need to define all the resources you want to allow throwing events to this Atomic Scope instance. As mentioned, resources can be a BizTalk Environment, an Azure resource group, an API Resource or a Microsoft Flow Resource. Every resource you define can only be linked to 1 Atomic Scope instance and associated with only 1 workspace (see step 5). To define a new resource, go to Settings -> Resources and click on Add resource. Depending on the type of resource, you need to fill in some more details.
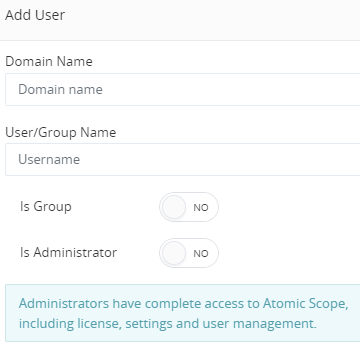
4. Create AD-groups and/or AD-users
After a new fresh installation, only the Active Directory user who performed the installation will have full admin rights on Atomic Scope. To be able to give additional users and/or groups access rights as well, we first need to define them in Atomic Scope. To do so, go to Settings -> User Management and add some extra user’s and/or groups. If you turn on the “Is Administrator” flag already on this level, the specific user will have complete access to everything. If you want to restrict access rights, you can create specific role-based access policies on Business Process level. With the possibility of using Windows Active Directory Groups, you can give the responsibility of user access policies maintenance to another team in the domain.
5. Create workspace and associate to resources
In the 5
th step, we are going to create a workspace. This workspace can have multiple business processes later on and will be the container of all tracked data, across all business processes, that an authorized business user can see. To create a workspace, go to Settings -> Workspaces and click on “Add Workspace”.

While creating a workspace, you will already be able to associate 1 or more resources, under Available resources, that you have defined in step 3 by just clicking on “Associate”.
6. Create business processes and assign user access rights
Now it is the time to create the first business process. Before starting, it might be a good idea to first define everything on paper and really sit back for a while and think on every possible business scenario that you want to cover. Doing so might help in defining meaningful names for all business processes, milestones and KPI’s involved.
Whenever you are ready, go to the “Business Process” tab and click on “Add business process” to create the first business process. Give it a meaningful name and click on “Save”. It is always a good idea to save on a regular basis so all your changes are stored in the Atomic Scope database.
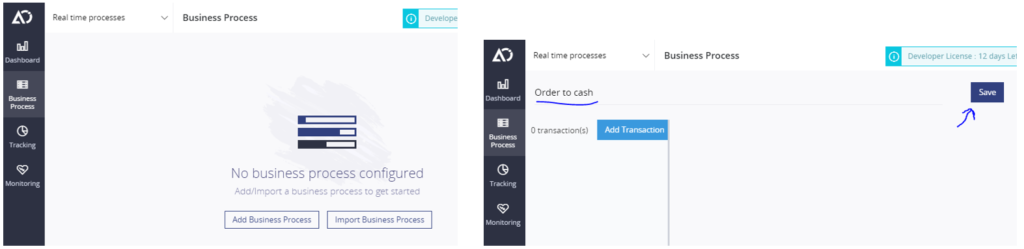
When the business process is created, you can define your user access policies by clicking the “Access Policy” button. Next to this, you can change the tracking and purging settings.
For the user access policies, you need to take a few roles into account. The 4 roles already foreseen in the product are:
- Business Process Reader
- Message Content Viewer
- Message Reprocessor
- Business Process Owner
For more information what these roles exactly mean, please have a look
here.
7. Create Transactions and Stages
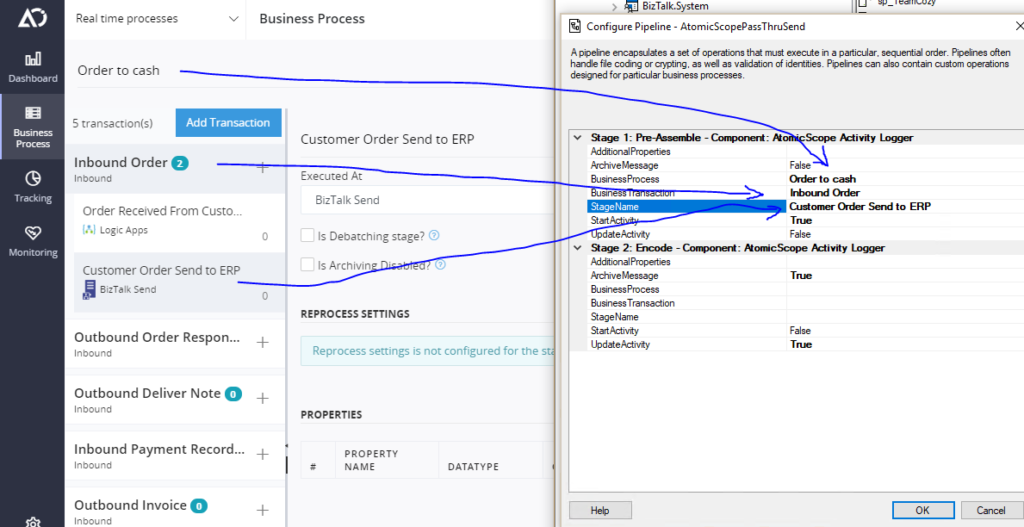
For every sub-process in the business process, you can now start creating Transactions. This part of the business process definition is the one where you really need to be careful because the naming (of Business Process, Transaction and Stage) will also be part of your runtime implementation. Choosing these names correctly, right from the first time, will avoid changing and redeploying your runtime just because of the need for a naming change in your tracking. Both in a BizTalk pipeline component, as in a Logic app action, as in some API calls, these are the settings you need to configure, to make sure the Atomic Scope platform is able of processing the right events and associate them to the right business processes. Actually, it always comes to the same principle: throw 2 events, 1 Start and 1 Update event. The time between start and update, the stage will become visible in an orange colour as “In Progress”. Both events need to have knowledge of:
- Business Process Name
- Transaction Name
- Stage Name
- Previous Stage (if not the first event)
- Main Activity Id (if not the first event)
- Stage Activity Id (in case of an update)
This allows the platform to define the correct stage and to know what KPI’s needs to be tracked (for more on this, check next chapter).
BizTalk pipeline example
Within a BizTalk pipeline, a first pipeline component will have the configuration configured, will use it and will write it into a specific Atomic Scope promoted property schema. That is why you do not need to configure all properties again into the second pipeline component doing the update event. All needed information, as well as “Main Activity Id” and “Stage Activity Id”, are taken from the context properties.
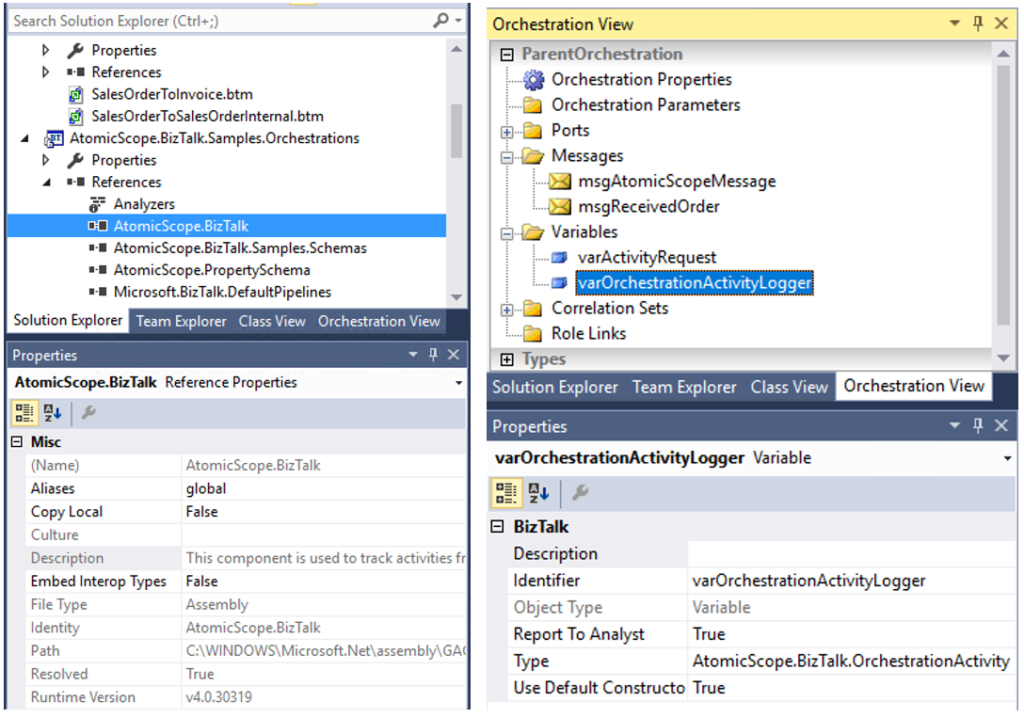
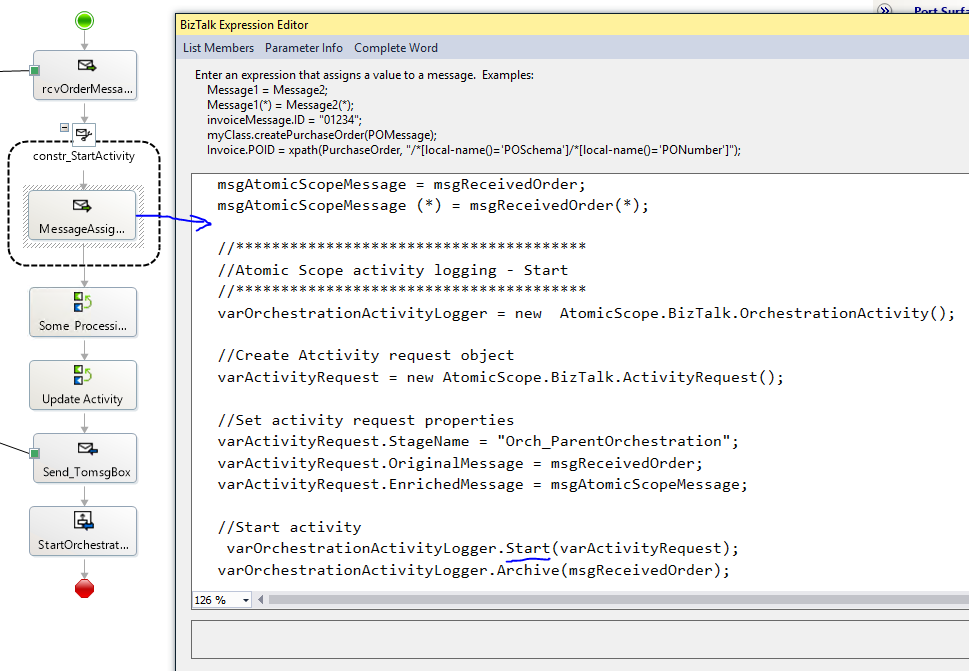
BizTalk Orchestration example
How to track events from within BizTalk orchestration’s is very well explained
here. It will guide you through the SDK examples. But it is all related to calling the correct function from the Atomic Scope helper assemblies which are provided. So in short, create a reference to “AtomicScope.BizTalk.dll”, create the variables and use them to create new events.
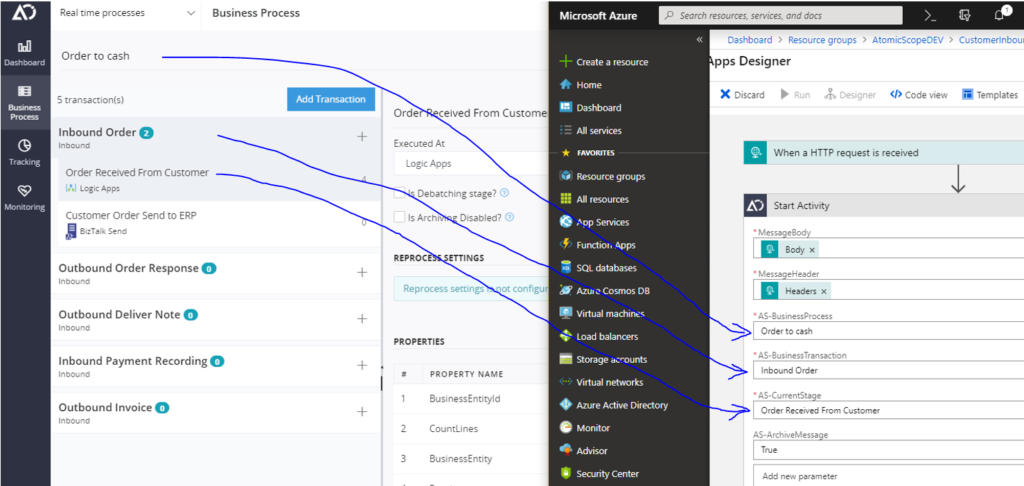
Logic App example
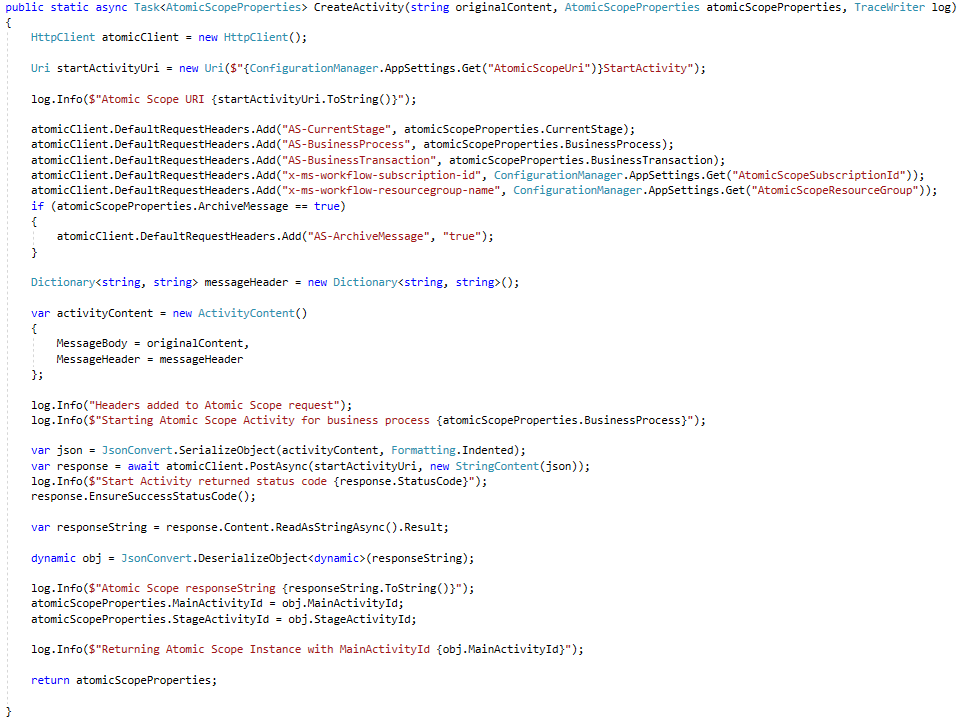
Azure Function example
From within an Azure Function, you are also able to throw events directly to the EventHub instance created by the Atomic Scope installation. I created an AtomicScope helper class that looks like this:
8. Configuring KPI’s
Configuring KPI’s of all business data of your interest, where you want to be able to search for, is more flexible and can be adopted at any given moment. Every new event that will occur will take the newly added configuration directly into account, without modifying anything in your cloud or BizTalk runtime.
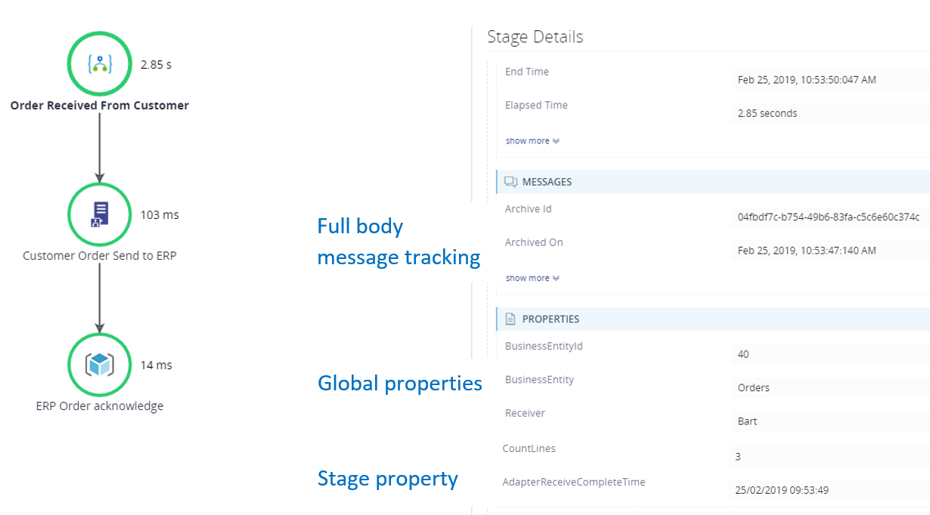
First of all, you need to know that there are 2 different types of data properties you can configure, being Global properties and Stage properties. Also, here you need to use the correct type for the correct reason. Global properties are relevant for
every stage in your entire Atomic Scope instance and will be visible in the grid when you perform a search on the native Tracking screen.

Stage properties, on the other hand, can be exclusive for 1 specific stage. Stage properties will not be visible in the grid but will be visible in the detail screen next to the global properties tracked for that specific stage. So, in the end, the goal is to have a view like below, where all bullets visualize a specific milestone or stage. If you click on such a milestone you will get the details of this stage, all global and stage properties show up under “PROPERTIES” and, if configured, the full body message as well under “MESSAGES”.
As far as we are now, all these properties will not yet be tracked and will not be visible in the Tracking screen. To accomplish that, you need to define where the runtime can find these values. These values can be:
- Part of the XML/Json message
- BizTalk promoted properties
- HTTP Header key
- Constant values
The nice part is that it is possible to change this configuration on the fly. When a new value needs to be tracked, just change the configuration at the Stage level and the next processed message will have this new property tracked.

9. Configure reprocessing
If you want to be able to reprocess an incoming message, you need to do 2 things:
- Enable archiving in the runtime – to have a copy of the incoming message in Atomic Scope
- Configure reprocessing – on the Stage where you archived the correct message
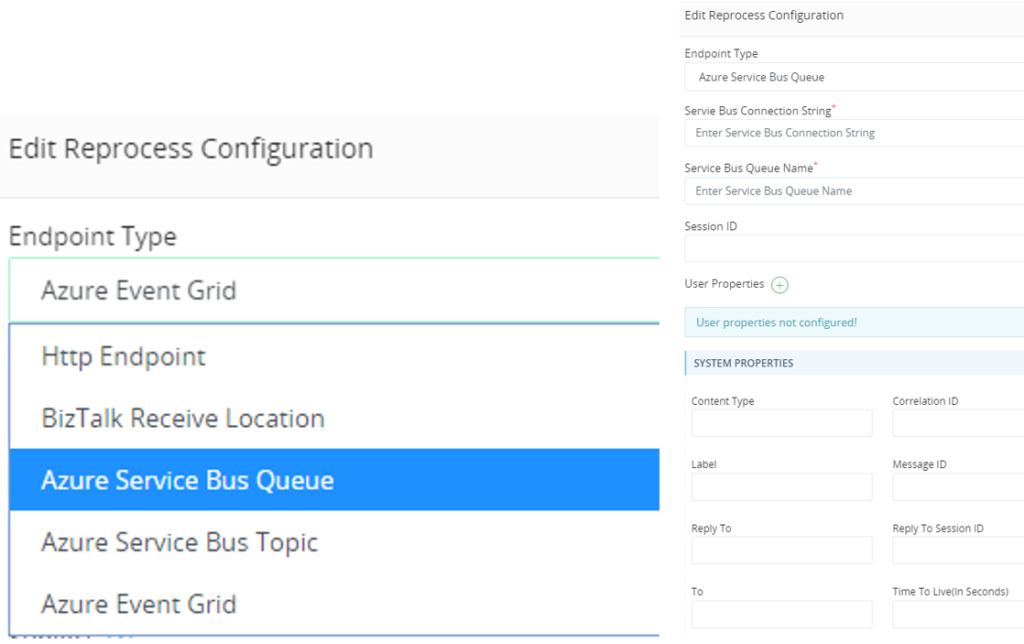
For the reprocess itself a few options are available. Most of them speak for themselves, for example in case of Azure Service Bus, it is obvious that you need to configure a Service Bus Connection string where the message can be dropped. In this case, when you click on Reprocess in the Tracking portal, the platform will create a new message on the configured Service Bus queue; nothing more. This means that, if this queue is just a separated “reprocess queue” next to the “normal processing path”, you still need to foresee some stuff that will look for messages on this queue and do something to get them really processed. If, for example, you expose a frontend API to your 3
rd party customers, you might be able to configure the message reprocessing to resend the same message again to the same frontend API.
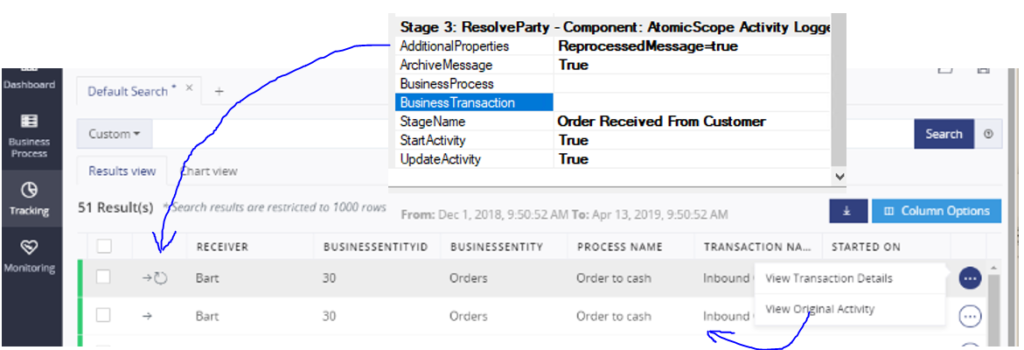
For a BizTalk Receive Location, a few more words here can explain a little bit more about its concept. When this type of reprocessing is configured and when a message is reprocessed from within the platform, a copy of the archived message will be inserted into a dedicated reprocessing table within the database. The platform also foresees in a stored procedure that can be used to create a WCF-SQL Receive Location in BizTalk that enables you, having the same message once more in the BizTalk runtime. In the BizTalk scenario, do not forget to add the “ReprocessedMessage=true” additional property in the Atomic Scope BizTalk pipeline component configuration, doing this will make “reprocessed messages” also visible as such in the portal. A link to the original message will also be visible. For more detailed information on this feature, have a look at
https://docs.atomicscope.com/docs/reprocessing.
10. Look into the (near) future
With the big switch from on-premise applications into cloud-hosted applications, Atomic Scope brings the most added value with the “built for hybrid” concept. Both events occurring in the cloud as on-premises are correlated together and visualized to the business user in 1 common view. Today, in the current product, the main part is installed on-premises (or in the cloud on an IaaS platform). As you can read
here, the product team is preparing for the future where you might have the choice to host the main part of your solution in a SaaS model where you can rely on a Serverless360 subscription to host your Atomic Scope instance. The start is given with the Tracking portal, hopefully, the rest will follow in the future?
Conclusion
After reading this Atomic Scope Quick Start Guide, you might be able to have a quick start on Atomic Scope with some real-world scenario’s and be able to deliver some more inside views on your current business to the people that need it the most.
If you need some help while starting with Atomic Scope, please reach out to me via
Integration.Team or bart.scheurweghs@integration.team. We can help you out with all best practices as we already have implemented real live business scenarios on real live customer challenges.
Author: Bart Scheurweghs
Bart Scheurweghs is a Senior Integration Architect at Integration.Team, a company specialized in connecting data, processes and devices on-premise and in the cloud, unlocking new business potential for small and large organizations, using Microsoft technologies.
Bart started his integration career with BizTalk Server 2000 and from then on continued guiding integration solutions end-to-end, for different customers in any sector. Bart uses his experience to help customers build robust and advanced integration solutions. He has a great focus on all non-technical requirements, just get it working is not good enough anymore. Visualization of all implemented interfaces is as important as the interfaces itself.
View all posts by Bart Scheurweghs
