If you are here reading this, I’m assuming you want to know more about Custom connectors and how it is being used to track data in Atomic Scope. So basically, a custom connector is nothing but an OPEN API Definition swagger JSON.
Why build an Azure custom connector?
Microsoft has a vast library of services that support custom connectors. You can create one single connector and it can be used by multiple customers for various scenarios. When you build a custom connector, it can be used in
- Azure Logic Apps
- Microsoft Flow
- PowerApps
Even though the current connector library has a vast collection of connectors, there are some cases where your scenario or use case is not supported by a connector and you need to override or perform any additional operation on top of it.
Security
One of the key advantages of having a custom connector is reusability so that you don’t need to solve the same problem again. For large organizations and enterprises to consider creating a connector is the various ways of security protocols available for controlling access to your API. There are several ways using which you can secure your connector, we choose the simplest approach here of using an API Key. We are not going to elaborate on how to do so for more information here.

Creating the custom connectors
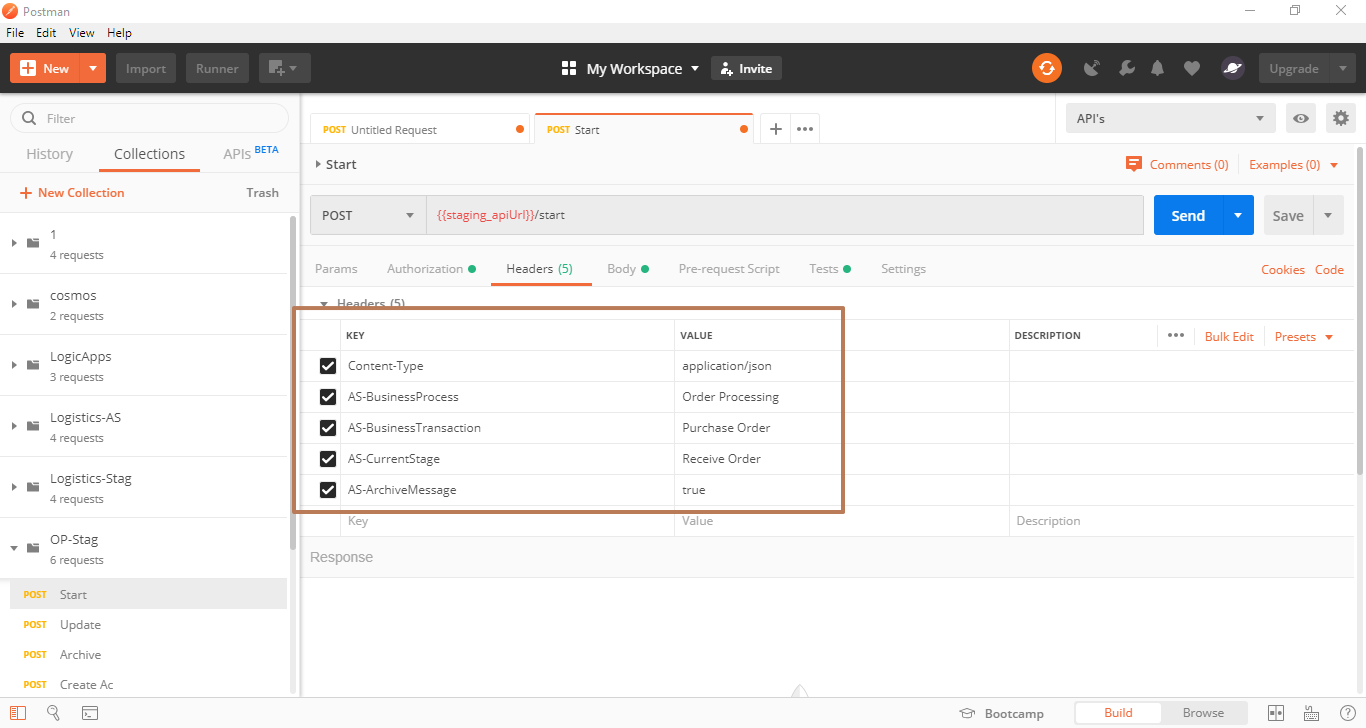
The easiest way to create a connector is to start by consuming your API from a Postman. In our case, we had the Atomic Scope Azure Functions which takes care of the tracking work. So the functions act as an API here. The functions are triggered by HTTP Post and are certain required things like some mandatory headers which need to be passed via headers for the functions to track data. An example postman request is shown in the below image. We normally call the API in the usual way with the required headers and pass the message body and the content-type.
Once you have formed the request for all the API’s you can save them as a collection, export it and it can be directly imported for creating a connector.
Exploring the swagger
We will be adding a few more properties to the generated swagger.json, which makes it deployment ready. The basic structure of the swagger is the same as any other common REST swaggers. It will have some properties like basePath, schemes, etc.. Some of the important properties like Host – Endpoint URL pointing to the API which will be hosted somewhere on the cloud Paths – Multiple API paths redirecting to various operations In our case, we have four operations in Atomic Scope so we have 4 different paths like
- Api/StartActivity
- Api/UpdateActivity
- Api/LogExceptionActivity
- Api/ArchiveActivity
You can use the ExportTemplate / Automation Script option from the Azure portal to get the json template, which you can right away deploy using code or use the Template Deployment in Azure.
Custom connector- Swagger relation
If you take a look at the connector, it has some properties like Business Process, Business Transaction, Current Stage, etc.. Some are marked with * to indicate it is a mandatory field. There is also a Boolean flag that points whether the message can be archived or not.
To relate this, we need to closely look at each individual API definitions inside the swagger. Let’s assume we are looking at the start activity connector. If you now check the API/StartActivity path inside the swagger, inside the parameters array. This is where the API takes input from the user. You can have n number of inputs here, but it will make the connector UI look cluttered. Always try to minimize the input from users.
Managing inputs of the custom connector
Atomic Scope can process any message type, be it JSON, XML,FLATFILE,EDI, etc. So we need to receive an object as an input message. So we have two objects which can be dynamically constructed by the users. The MessageBody and MessageHeader. In order to make the filed as mandatory we have a property called required which can be set to true so that the * gets visible in the connector.
                 {

                    "name": "AS-BusinessProcess",

                    "in": "header",

                    "type": "string",

                    "description": "Provide business process name.",

                    "required": true

                  }
In order to show a dropdown for the user to select something, you can make use of the Enum in this use case. So here in our use case, users can archive the message at any point in time. So we have the Archive flag which can be turned on and off by user’s preference.
               {

                    "name": "AS-ArchiveMessage",

                    "in": "header",

                    "type": "string",

                    "required": false,

                    "enum": [

                      "True",

                      "False"

                    ]

                  }
Deployment Techniques
We can deploy the connectors using a number of techniques. In Atomic Scope, we offer the users to deploy them right from the portal or using a PowerShell script. There are many other ways to do this like using a different language of choice is also possible.
Consuming the azure custom connectors
The connectors can be consumed from all the different Microsoft Azure services which I mentioned earlier. Let’s see a small example of consuming the connectors from Azure Logic Apps and Microsoft Flow.

The above example shows an action called Start Activity consumed from the Atomic Scope’s list of actions available. Notice the things that we mentioned earlier like the mandatory parameters and objects input for Body and Headers.
Similar to the above there are also other actions like Update / Log Exception which can be consumed in a similar manner.
Conclusion
So creating a custom connector from scratch can be a bit time-consuming. But once it’s done it can be shared across an organization or can be submitted to Microsoft for certification so you don’t have to deploy them, it’s available for all customers in Azure.